|
Institut f³r Informatik
|
Lehr- und Forschungseinheit f³r
Programmier- und Modellierungsprachen
|
| á |
|
Oettingenstra▀e 67
|
D-80538 M³nchen
|
SPEX Viewer: A Graphical User Interface for SPEX
Markus Spannagel
Projektarbeit
|
Beginn der Arbeit:
|
01.10.2002
|
|
Abgabe der Arbeit:
|
28.02.2003
|
|
Betreuer:
|
Prof. Dr. Franþois Bry
Dipl.-Ing. Dan Olteanu
|
á
Contents
- 1. About SPEX
- 2. Goals of this study
- 3. Software Layout
- 4. Suggestions for Improvement of the Current Version
- 5. Conclusion
Appendix
- SPEX Viewer User Manual
- Javadoc
- References
á
SPEX[1] is a streamed and progressive evaluation of path expressions against XML streams.[2]
In contrast to common approaches, which get all the XML data into
memory and then to query it, SPEX is intended to query huge documents
or unbounded streams of XML data. SPEX reduces the needed memory space
for evaluating path expressions by using only forward path expressions
and storing only that parts of the XML stream, which can be possibly
an output, called candidates.
Forward path expression[3] abandon on reverse axes, such as ancestor and preceding.
The candidates are stored until SPEX is able to decide, if they are valid result for the query or not.
In a newer version of SPEX there is an approximation algorithm to drop candidates before a memory overflow happens.
For the evaluation SPEX needs two inputs:
SPEX evaluates the query on the XML stream by using a transducer network which is derived from the query expression.
The evaluation is actually done by the transducers, which communicate to each other using a message system.
Each transducer has input and output tapes, which connect to their next or previous transducer.
The resulting network is a Directed Acyclic Graph (DAG) with the transducers as nodes and the tapes as edges.
The evaluation process is single threaded. At one point of time exactly one transducer is active, doing its particular work for the evaluation.
In this way is one step of the evaluation process defined.
There are various types of transducers involved in the evaluation. Each
one has a set of properties, whose meaning is mostly transparent to the
Viewer.
Three special transducers types, each exactly used once in a network, have more meaning to the Viewer:
The goal of this study is to design and implement a graphical user interface (GUI) for the SPEX, called SPEX Viewer.
The purposes of the SPEX Viewer are:
It is not an editor for a
visual query language. Although in future it may be possible to enter
the query expression not by using a common query language but by
directly creating a transducer network. But this not an issue of this
project thesis.
The SPEX Viewer is a modern
desktop application controlled by a menu, tool bars or shortcut keys.
It provides context tool tips and a user manual. The usage should be
intuitive. It controls the SPEX processor.
The SPEX Viewer is implemented as a listener for the SPEX, mostly independent on the source code of the SPEX.
It provides controls to select an input source of three different types:
The path expression can be entered in different query languages.
It supports four different views:
While the views for the input,
candidates and output are simple text views, the transducer network is
an interactive graph. The transducers are displayed as movable boxes
containing text information. They can be hidden, or shown with more
details. The scale of the graph is sizeable and its layout can be
optimized.
A status line shows debug information of the currently active transducer.
During the evaluation process the
active node is marked and its properties are updated in the view. The
evaluation can be set to step by step mode, so it waits for the next
step until the user gives a command. It can be also set to continuous
mode and the delay time between two steps can be adjusted.
Breakpoints can be set to
transducers, so the evaluation holds and switches to step by step mode
when the transducer gets active and has the properties defined within
the breakpoint-properties.
The Viewer is implemented without changing the code of the SPEX processor.
The SPEX Viewer is written in Java.
The Viewer is implemented as a listener for the SPEX. So SPEX can run
without the Viewer and the development of the Viewer does not influence
the SPEX's source code. The connection between SPEX and its Viewer is
kept minimal, so that future changes in the SPEX's core or the Viewer's
code can be done without interfering with the other.
The GUI control elements are implemented using the Java Swing Library [4], the code documentation is written in Javadoc [5].
A graphical user interface (GUI) is a human-machine interface. It has to fit to the machine and to the human.
The appearance is additionally to correctness, efficiency and easy maintainability an essential for developing GUIs.
A modern desktop application must
have an intuitive functionality. Any user, experienced in the matter
the software, should be able to work with the software without reading
a manual, at least basically.
The labels and tool tips for control elements must describe brief and exactly it's functionality.
Control elements, which are not workable for the current document status, should be disabled or hidden.
The meaning of the icons should be clear in the context and all icons of an application should follow one design pattern.
An online user manual is part of any professional software in our days.
GUI libraries, like the swing[4] library used for this project, offer common controls like menu, tool bar, button, text-field, etc. as well as container classes
for windows and views inside. Common dialogs, like filebrowser or color chooser, are also part of a modern GUI library.
The Microsoft Foundation Class (MFC) library, for example, offers a whole document to view architecture to assure that
the windows applications follow the same GUI design pattern.
The equality of the software usage in windows can be considered as one of the reasons for the commercial success of Microsoft.
Writing a good graphical user interface is to adjust the software to the habits of the user.
á
This study is to design
and implement a graphical user interface for an existing software. The
only sophisticated part is the design of the view for the transducer
network.
The Viewer is developed in a straight forward way:
This approach allows to
test every part of the software right after the implementation and new
or changed requests can be easier realized.
| Package | Classes for |
| spex.listeners.gui |
Application Window
Control Elements
Initialisation for SPEX |
| spex.listeners.gui.dialogs |
Dialog windows |
| spex.listeners.gui.util |
Exception |
| spex.listeners.gui.views |
The views and their container |
| spex.listeners.gui.views.network |
The Transducer Network |
á
This is the top level
package for the SPEX Viewer. Here are the classes for the application
window, the control elements and the initialisation for the SPEX
evaluation.
Class List:
á
This package contains classes for each dialog window. All classes in this package are derived from javax.swing.JDialog[4].
Class List:
- Class AboutDialog
provides a HTML 3.2 browser window to display general informations about SPEX and the user manual.
- Class BreakpointDialog
maps the attributes of the class Breakpoint on dialog elements to edit the breakpoint properties.
- Class GraphOptionsDialog
provides a dialog window to edit the customizable graph options and the ColorDialog.
- Class ColorDialog
lets the user set the network view colors.
All dialogs, besides the AboutDialog, own an updateData method responsible for the data exchange.
Package spex.listeners.gui.util
This package just contains the class GuiException used for custom exception thrown by the SPEX Viewer classes.
Package spex.listeners.gui.views
This package contains classes for each view and the container for the views.
Class List:
- Class MainViewPanel
is responsible for the arrangement of the four views (input, candidates, output, transducer network).
It uses split panes to separate the views.
- Class CandidateView
is a simple text view for the candidates. It just displays the given text, deleting the existent one.
- Class OutputView
is a simple text view used for the input and output view. Given text
is appended and the indent for the XML semantics is provided.
- Class NetworkView
is derived from javax.swing.JPanel[4] and provides the container to paint the transducer network.
It is also responsible for:
- Mouse actions and context menu inside the network view
- The zoom function
- Construction of the graphical transducer nodes
Package spex.listeners.gui.views.network
This package contains classes for the transducer network used by the class NetworkView.
Class List:
- Class RectArea
is the base class for all objects painted in the network. It provides the methods to check overlapping of two
- Class GraphElement
is the abstract base class for TransducerNode and Edge.
- Class TrandsducerNode
is the graphical representation of a SPEX transducer. In this class
is the listener method for the actions of the SPEX transducer.
- Class Edge
is the graphical representation for the input/output tapes, the connection between the transducers.
It is composed of EdgeParts.
- Class EdgePart
derives from RectArea.
An Instance of EdgePart is either a vertical or horizontal line with an optional pointer.
- Class GraphManager
stores all TransducerNodes and Edges, calculates the overlapping of objects,
and finds GraphElements within a RectArea.
It also manages the painting of changed objects.
- Class Chain
is responsible for the optimized graph layout.
- Class Breakpoint
stores the properties for a breakpoint.
Here is
the static UML model for the elements within the network view. For
better survey the classes are shown without methods or static
attributes:
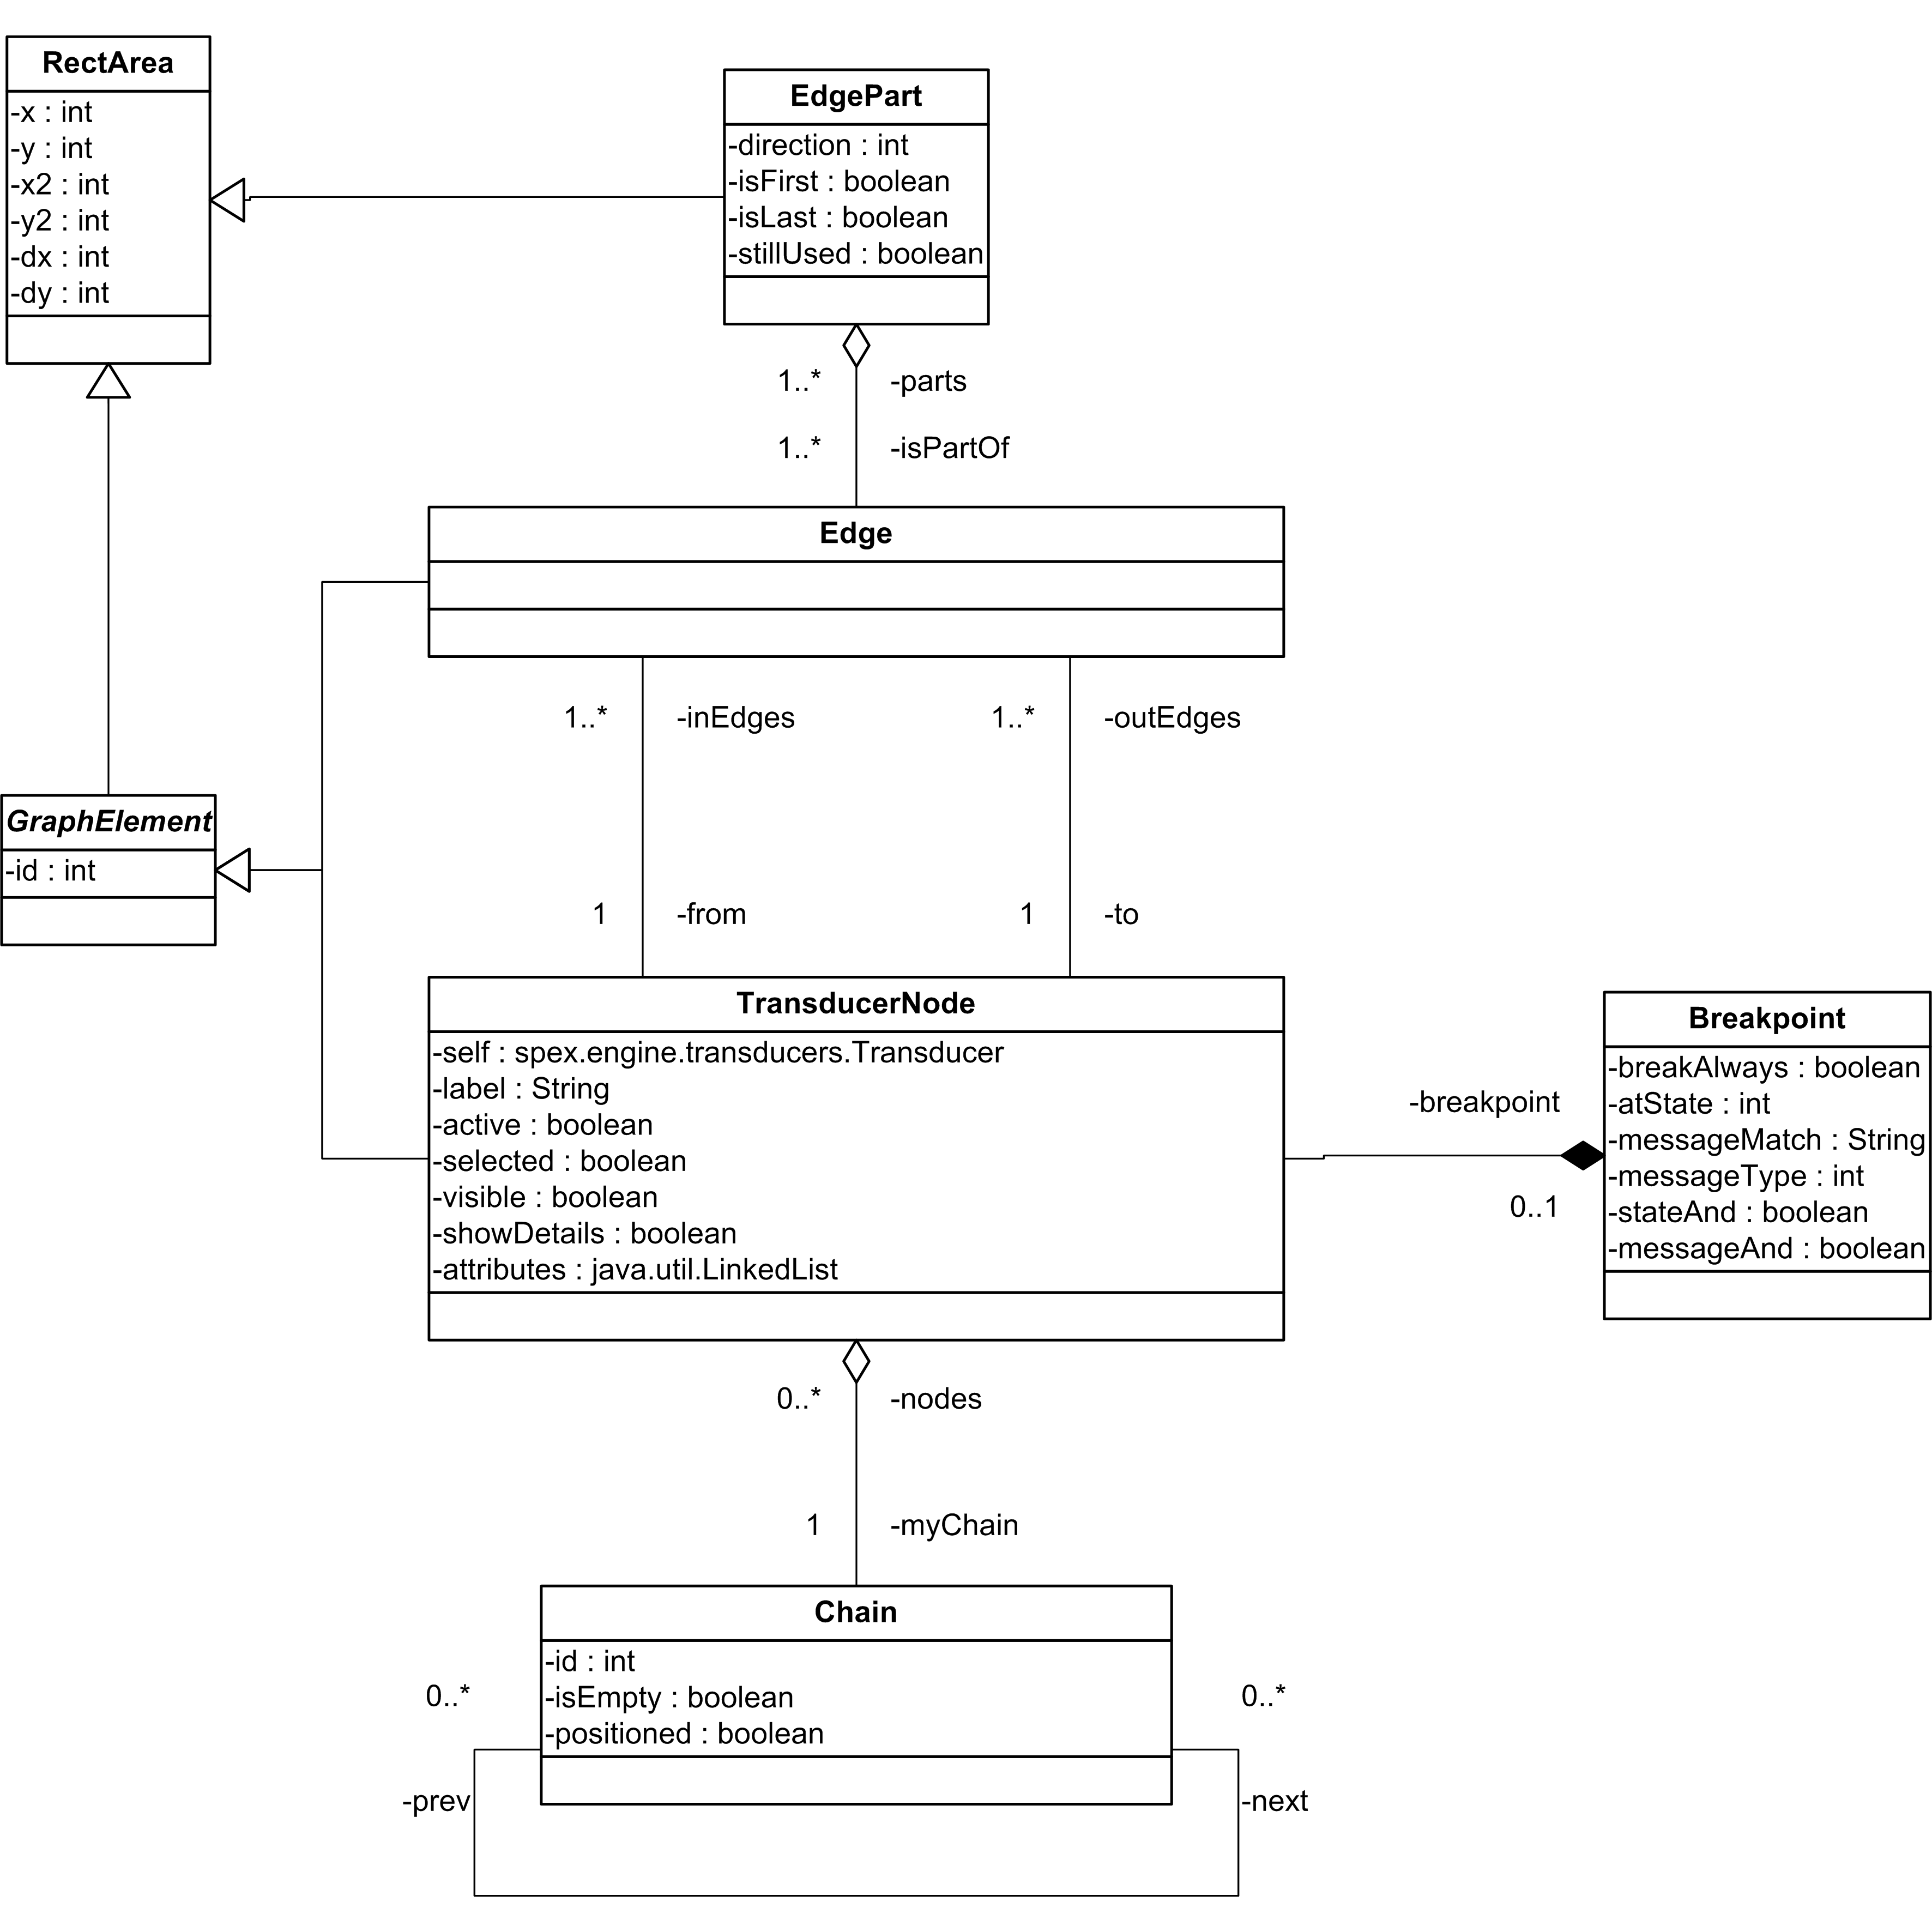
Instances of the base class RectArea are used to describe any rectangle area within the graph,
for example the selection gadget or the area which needs to repaint after movements or updates of the transducers.
The class GraphElement is an abstract class for elements of the graph, the edges and nodes.
An Edge is composed of EdgeParts.
Whenever an edge is changed, it's parts are destroyed and new parts are created.
The association EdgePart isPartOf Edge with multiplicity 1..* is for the current version of the software dispensable.
This was designed for smart Edges, which care about overlapping each other or nodes.
Smart Edges should have been able to share EdgeParts for the same origin or destination.
The class Chain is not represented by any object within the graph, it is to structure the graph for the optimized layout.
Two painting methods are implemented in the current version of the SPEX Viewer:
The user can select one in the graph options dialog. Paint dirty rect is the default.
This
was the first painting method designed. All changed objects are stored
and whenever the paint method of the network view is called, these
objects are unpainted at their old position and repainted at their new
position. This method leads to screen flickering when a group of nodes
is moved.
Using this painting method, an instance of RectArea, called dirtyRect
is stretched out to cover all changed objects. When the paint method of
the network view is called, this rectangle is unpainted and all objects
overlapping this area are repainted.
All in all this is the better painting method because it solved the screen flickering problem of the first method.
It's performance is better or equal, even though unchanged objects are repainted because they overlap the dirtyRect.
And last but not least, it's implementation is less elaborate.
The Unpaint each is still in the current version of the SPEX Viewer, because it can be more performant on very large networks
when edges are not continuously repainted while movement.
The layout algorithm is realized in the class Chain.
After the initialisation of the SPEX processor and the creation of the
network, the graph is analyzed and it's sequential parts stored in
instances of the class Chain.
So called empty chains are also created in this process.
An empty chain contains only one edge and no node.
Class Chain is derived from RectArea.
The optimization works in vertical and horizontal direction. Here is
the horizontal direction described, the vertical is symmetric. The
algorithm uses 4 steps:
-
From the beginning all chains have their origin at the origin of the
graph. The first step arranges the nodes within each chain, which is
easy because a chain does not contain any branching, so the nodes are
arranged next to each other.
-
The second step arranges the chains in horizontal order. Each chain is shifted until all it's previous chains are left of it.
-
The next step takes overlapping chains and shifts them down until there are no more overlapping ones.
This algorithm prefers to shift non-empty short chains.
-
The last step of the algorithm adjusts the coordinates of the nodes to the position of their chain.
Adding
breakpoints to the transducer network is essential for debugging.
Doubleclicking a transducer node opens the breakpoint dialog to set the
properties for the breakpoint. Whenever a node with a breakpoint gets
active in continuous mode, the breakpoint properties are compared with
the properties of the transducer node. If the properties match, the
evaluation mode is set to step by step mode and a dialog message
informs the user that a breakpoint is reached.
The breakpoint properties are:
Message
type and message content can be logically connected and the transducer
status can be logically connected with the message properties.
Here are two an examples for the breakpoint dialog.
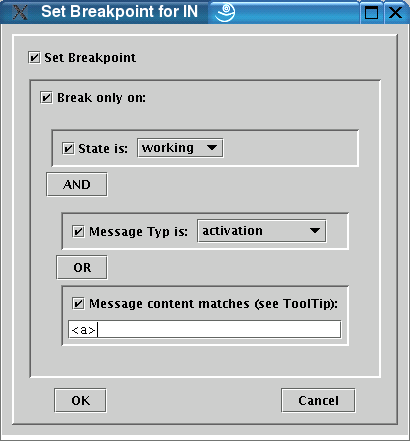 |
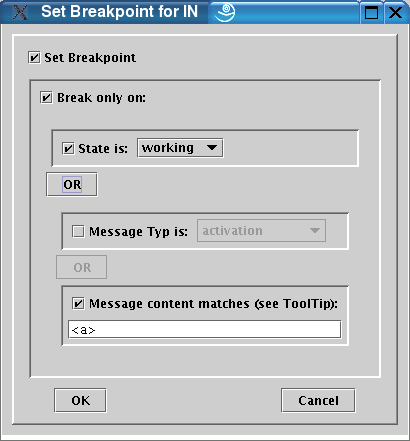 |
state==working
AND
( message.type==activation
ááOR
áámessage.content=="<a>"
) |
state==working
OR
message.content=="<a>" |
Here is the code example for the method Breakpoint.stopNow().
This method is called to check if a breakpoint matches and returns true if it does.
á
public boolean stopNow(Transducer curr) {

  if (breakAlways) return true;

  boolean stateBreak = (   (atState != DONT_MATCH)
                        && (curr.getState() == atState)
                       );

  Message cm = curr.getMessage();
  boolean messageTypBreak = (   cm != null
                             && (messageTyp != DONT_MATCH)
                             && (cm.getType() == messageTyp)
                            );

  boolean messageMatchBreak = (   cm != null
                               && ( messageMatch != null)
                               && (   cm.toString().matches(messageMatch)
                                   || cm.toString().startsWith(messageMatch)
                                  )
                              );

  boolean messageBreak;
  if ( messageAND ) messageBreak = (messageTypBreak && messageMatchBreak);
  else messageBreak = (messageTypBreak || messageMatchBreak);

  boolean result;
  if ( stateAND ) result = (messageBreak && stateBreak);
  else result = (messageBreak || stateBreak);

  return result;
}
By
adding one or two more properties to the breakpoint it is comfortable
to keep this structure. But, if the breakpoint properties shall grow
more powerful, it is recommendable to abandon the visual editor for the
options and use a text input, define a syntax and use a parser for the
properties and their logical connections.
Since the SPEX Viewer is
designed to be a presentation tool for the SPEX processor, it would be
best if the Viewer is avaliable over the Internet. The Viewer could
run as an applet in a HTML page, but SPEX needs access to the system
environment which is forbidden in applets.
So SPEX could be offered as a signed applet or as a singed Java Web Start[6] application.
In the current version of the SPEX Viewer the candidate view is a plain text output.
But the data for a candidate is divided into the content and a condition formula.
Furthermore there is a semantic structure about grouping the candidates.
A tree view might be more practical to display this information.
To implement a better candidate view, the class gui.views.CandidateView must be overwritten.
Quite a improvement for the SPEX viewer would be a persistence for the queries, storing the graph layout and the breakpoints.
So the user can prepare projects for teaching and presentation and
while debugging it's quite comfortable to continue the next day without
restoring the breakpoints and the layout.
In the current version of
the SPEX Viewer, the user has to select the input source and select its
type. But the type of the input source is implied in its source
address. So it is possible with slight changes in the classes InputSelector and GuiControls (for the placement of the current Drop Down Box),
to get rid of the input source type selection, and spare the user to select the type.
The algorithm to locate a transducer node, depending on the coordinates, runs through an ID-sorted array and returns the node.
Until now, SPEX Viewer is tested and used with less than 100 transducer nodes and runs without efficiency problems.
The search algorithm is often called, especially while moving nodes to avoid overlapping.
With more complex networks this could become an efficiency problem.
To solve this, it is recommended to change the algorithm.
For example sort the nodes depending on their coordinates and perform a binary search.
The responsible class is gui.views.network.GraphManager, there are all nodes and edges stored as well as the methods to find a node and overlapping objects.
The edges in the current version of the SPEX Viewer are called stupid.
This is because they don not care about other objects within the graph.
They are always composed out of three cartesian parts.
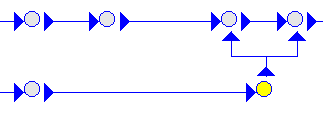
The two images are the same excerpt of a network with hidden (for better survey) nodes.
The left one is directly after the optimization.
The user is not able to see, where the two edges from the selected (yellow) node point to.
In the right image the selected node is moved to the right to reveal the targets of the two edges.
At first, it was intended to create also smart edges, searching a free way to their target.
But this problem was considered to extensive to solve it within a project thesis.
The goal of this study was to design and implement a graphical user interface (GUI) for an existing software.
Writing a GUI seems at the first look like an unambitious work for a computing scientist, because a GUI is generally only about
displaying existing data and offering control elements, which call existing methods.
The challenge on writing a GUI is
to design the appearance to present concise all informations and the
functionality of the represented software. For commercial software are
sophisticated well balanced GUIs essential. It does not matter how
ground-breaking your application is, without a proper GUI it will never
convince the broad mass of the users.
A pure GUI for SPEX would have been much simpler than the SPEX Viewer.
The functionality of SPEX is to evaluate a query on a XML stream.
Therefore a GUI is to select the source, enter the query, select an output target and eventually show a progress indicator.
The SPEX Viewer is not a GUI to use SPEX for evaluation purpose, it is designed for presentation and debugging.
The result of the evaluation is just displayed.
A possibility to send it to any target is not implemented, which would be an essential to use SPEX for real.
Instead it offers views for input, yet undecided output, the candidates, the interactive network and process control.
The most sophisticated part of this project thesis was to create the interactive network view.
It's greatest flaw are the so called stupid edges.
But software for creating really smart edges in an interactive graph view is rare and expensive.
AT&T for example offers an open source graph drawing software [7].
The result of this project thesis is a running graphical user
interface, already used as debugger for the further development of
SPEX. As the reader can see in chapter 4 Suggestions for Improvement of the Current Version,
there are a lot of possible improvements. Also some labels should be
renamed to make the meaning of some controls or views more
understandable for people not so familiar with with the SPEX processor.
Appendix
| Icon |
Menu |
Description |
| Evaluation process controls |
 |
Process - Init |
Initialises the SPEX Evaluation and clears the views. See Setting up SPEX for more information. |
 |
Process - Stop |
Ends the SPEX Evaluation, a new source or a new query can be entered. The Views are not cleared. |
 |
Process - Next Step |
Executes the next step in the evaluation process. |
 |
Process - Run |
Start/resumes the evaluation process (running mode).
Breakpoints can be added to the Transducer Network. |
 |
Process - Break |
Breaks the evaluation process (step by step mode). |
 |
The slider sets the delay time between two steps of the evaluation process. |
| View controls |
 |
View - Split View horizontal |
Tells the application to arrange the Transducer Network above all other views |
 |
View - Split View vertical |
Tells the application to arrange the Transducer Network left of all other views |
 |
View - Show Transducer Network |
Shows/hides the Transducer Network |
 |
View - Show Input Stream |
Shows/hides the Input Stream that is currently evaluated |
 |
View - Show Candidates |
Shows/hides the View for the Candidates of the SPEX process |
 |
View - Show Output |
Shows/hides the Output (Result) of the evaluation |
| Transducer Network View controls |
 |
Sets the zoom factor for Transducer Network |
 |
View - Network Graph Options |
Opens the Dialog for the Graph Options |
 |
View - Draw - Draw horizontal |
Arranges all Transducers of the network in a horizontal direction |
 |
View - Draw - Draw vertical |
Arranges all Transducers of the network in a vertical direction |
| other |
 |
Help - About SPEX Viewer |
Opens the About-dialog-box including the user manual |
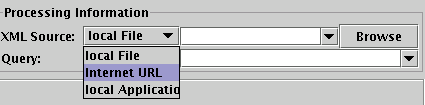
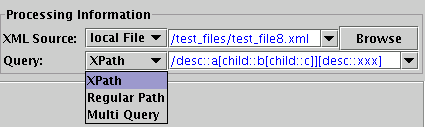
The SPEX processor needs 2 Inputs to work:
- The Input Source
You can select 3 different types of Input Sources:
- Local File: The path of a local file can be entered or selected with the Browse button.
- Internet URL: An URL can be entered as Input Source
- Local Application: The pathname of a local application can be entered or selected with the Browse button.
By initialising SPEX, the Viewer will start the application and take it's output as Input Source for the evaluation.
- The Query
Select which Query Language to use and enter the query into the text field:
The SPEX Processor is initialised by selecting Init from the Process menu
or click the Init Button:
If the SPEX processor is successfully initialised, the process controls are enabled, the Transducer Network is
created and the Views for the Input Stream, the Candidates and the Ouput are cleared.
There are 4 Views showing informations about the current state of the SPEX evaluation.
- The View for the
Transdcuer Network:
A graphical representation of the network, SPEX created for the evaluation.
The Transducer Network View is generally on top or left of the other Views.
- The View for the Input Stream:
Here is the Input Stream shown. The last line is the part of the Input Stream being right now processed.
The Input View is generally left or above the Candidate and Output View.
- The View for the Candidates:
Here are the Candidates shown. Candidates are data, SPEX has not been able yet to decide if it is an output or not.
The Candidate View is generally between the Input and Output View.
- The View for the Ouput:
Here is the output of the evaluation shown.
The Output View is generally right or beneath the Candidate and Input View.
Here is an example of all Views, shown in a horizontal split:
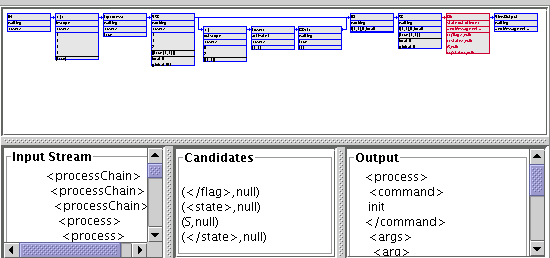
The Transducer Network is an acyclic directed graph (DAG).
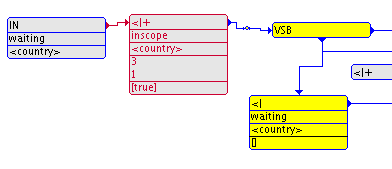
A SPEX Transducer is shown as a node in the Network:
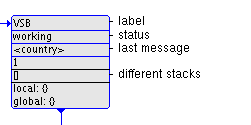
This node above is shown with details:
A node can be displayed in tree different ways:
Here is an excerpt of a typical Transducer Network:
One node can be selected by clicking with the left mouse button on it, the other nodes become deselected.
By clicking on the free space in the view all nodes will be deselected.
Pressing the SHIFT key while clicking will add the node to the selected.
Pressing the CTRL key while clicking will toggle the selection of the node. The selection of the other nodes remains.
While keeping the mouse button pressed all selected nodes can be moved.
Overlapping each others is avoided automatically by the nodes
themselves.
Edges cannot be modified by the user.
A double click on a node opens the Breakpoint Dialog.
In running mode the evaluation holds when a node gets active and its condition matches the given breakpoint.
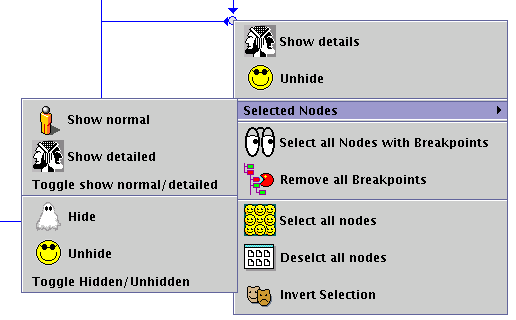
Right click in the view opens a context menu for:
- showing the (selected) node(s) detailed/normal
- hiding/unhiding the (selected) node(s)
- removing all breakpoints
- selecting all nodes with breakpoints set
- select all nodes
- deselect all nodes
- toggle selection for all nodes
The context menu shows the possible options for the selected nodes and
the possible options for the current node, when the right click is
performed over a node. Here is an example for the context menu over a
hidden node.
Doubleclick a Transducer to set a breakpoint. The Breakpoint Dialog opens and the conditions for the breakpoint can be set.
The first option Set Breakpoint in the Dialog sets/unsets the breakpoint.
When it is selected the conditions for the breakpoint can be set:
All settings here are saved to the file .SPEXViewerSettings in your home directory. If you want to restore the defaults, delete this file.
Calculate and paint new Edges while moving nodes:
When it is deselected, edges are not repainted while moving nodes.
Deselect it if you get performance problems while moving nodes.
Use "stupid" edges
Stupid edges do not care whether they overlap each other or nodes.
Use "smart" edges
Smart edges are unfortunately not yet implemented.
Painting Method
Select one of two painting methods. The default one works better.
Allow Graph Editing while running
When it is deselected, it is not possible to edit the Transducer Network while the evaluation process is in running mode.
Optimize Network graph automatically for the current Split Mode
When it is selected, the graph optimization is called after clicking on the split mode button (split horizontal/vertical).
Maximum lines in Input/OutputView Options
The maximum amount of lines shown in the view for the Input Stream and the Output is set here.
Set Colors button
This button opens a common dialog to set the colors for the Transducer Network.
All classes, attributes and methods are commented out with valid Javadoc[5] Code.
To compile the Javadoc for the SPEX Viewer change into the listeners/gui subdirectory of the SPEX's source code and execute make guidoc.
To view the compiled Javadoc documents, browse
listeners/gui/Doc/JavaDoc/index.html.